MariaDB Galera Cluster
| Setup Details |
hostname: infrabase1 Network: 10.1.65.0/24 IP Address : 10.1.65.11 Subnet Mask: 255.255.255.0 Gateway: 10.1.65.1 DNS: 8.8.8.8 sudo user: kedar Container: db1 Network: 10.1.65.0/24 IP Address : 10.1.65.108 Subnet Mask: 255.255.255.0 Gateway: 10.1.65.1 DNS: 8.8.8.8 sudo user: kedar Container: db2 Network: 10.1.65.0/24 IP Address : 10.1.65.109 Subnet Mask: 255.255.255.0 Gateway: 10.1.65.1 DNS: 8.8.8.8 sudo user: kedar Container: haproxy Network: 10.1.65.0/24 IP Address : 10.1.65.110 Subnet Mask: 255.255.255.0 Gateway: 10.1.65.1 DNS: 8.8.8.8 sudo user: kedar User PC Details PC type: Desktop OS: Ubuntu Desktop IP Address: 10.1.65.160 |
Introduction
MariaDB can be configured in a Master-Master mode allowing multiple applications talking to specific master databases, at the same time keeping all the master databases in sync to achieve high availability. MariaDB uses galera to configure high availability cluster which puts two or more databases in Master-Master Configuration. It is often called as MariaDB Galera Cluster. In addition to the HA cluster there will be description on how to implement HA Proxy. HA Proxy does the load balancing on the database nodes configured in Master-Master configuration. This allows any DB to fail, as HA Proxy will forward all requests to the other operational databases. Once the failed node is operational, all the databases will sync on the node and will be admitted in the cluster by galera. HA Proxy will begin load balancing again on all available nodes.
Environment
- Database Node 1
- Operating System: Ubuntu 18.04 server
- IP Address: 10.1.65.108
- hostname: galera-db-01
- Software installed: Mariadb Server
- Database Node 2
- Operating System: Ubuntu 18.04 server
- IP Address: 10.1.65.109
- hostname: galera-db-02
- Software installed: Mariadb Server
- HA Proxy
- Operating System: Ubuntu 18.04 server
- IP Address: 10.1.65.110
- hastname: haproxy
- Software installed: haproxy, mariadb-client
- Apache Web Server
- Operating System: Ubuntu 18.04 server
- IP Address: 10.1.65.107
- hostname: webserver
- Software installed: Apache webserver
In addition to the above 3 server vms, we will also need an application server / web server to test. . For simplicity we shall use apache web server and install a wordpress instance.
Instructions
Database Node 1
Run all the commands below in the terminal of the db server
$ sudo apt update && sudo apt upgrade -y
$ sudo apt install mariadb-server
$ sudo mysql_secure_installation (Answer questions diligently)
$ sudo systemctl stop mariadb
$ cd /etc/mysql/mariadb.conf.d
$ sudo nano 50-server.cnf
Content of the file should be as below
# this is read by the standalone daemon and embedded servers
[server]

[client]
default-character-set=utf8mb4

[mysql]
default-character-set = utf8mb4

# this is only for the mysqld standalone daemon
[mysqld]
user            = mysql
pid-file        = /var/run/mysqld/mysqld.pid
socket          = /var/run/mysqld/mysqld.sock
port            = 3306
basedir         = /usr
datadir         = /var/lib/mysql
tmpdir          = /tmp
lc-messages-dir = /usr/share/mysql
skip-external-locking
innodb_file_format = Barracuda
innodb_file_per_table = 1
innodb_large_prefix
character-set-server = utf8mb4
collation-server = utf8mb4_unicode_ci
skip-character-set-client-handshake

key_buffer_size         = 16M
max_allowed_packet      = 16M
thread_stack            = 192K
thread_cache_size       = 8
myisam_recover_options  = BACKUP
query_cache_limit       = 1M
query_cache_size        = 16M

#Decide to enable the below arguments if you want to enable
#logs. These will generate a log logs. Be careful with size.

#general_log_file        = /var/log/mysql/mysql.log
#general_log             = 1
log_error = /var/log/mysql/error.log
expire_logs_days        = 10
max_binlog_size   = 100M
character-set-server  = utf8mb4
collation-server      = utf8mb4_general_ci

[embedded]

[mariadb]

[mariadb-10.1]
Save the above file and exit. Create a new file for maintaining the galera configuration in /etc/mysql/mariadb.conf.d/galera.cnf
[mysqld]
bind-address=0.0.0.0
default_storage_engine=InnoDB
binlog_format=row
innodb_autoinc_lock_mode=2

# Galera cluster configuration
wsrep_on=ON
wsrep_provider=/usr/lib/galera/libgalera_smm.so
wsrep_cluster_address="gcomm://10.1.65.108,10.1.65.109"
wsrep_cluster_name="mariadb-galera-cluster"
wsrep_sst_method=rsync

# Cluster node configuration
wsrep_node_address="10.1.65.108"
wsrep_node_name="galera-db-01"
Save the file and exit.
Database Node 2
Run all the commands below in the terminal of the db server
$ sudo apt update && sudo apt upgrade -y
$ sudo apt install mariadb-server
$ sudo mysql_secure_installation (Answer questions diligently)
$ sudo systemctl stop mariadb
$ cd /etc/mysql/mariadb.conf.d
$ sudo nano 50-server.cnf
Content of the file should be as below
# this is read by the standalone daemon and embedded servers
[server]

[client]
default-character-set=utf8mb4

[mysql]
default-character-set = utf8mb4

# this is only for the mysqld standalone daemon
[mysqld]
user            = mysql
pid-file        = /var/run/mysqld/mysqld.pid
socket          = /var/run/mysqld/mysqld.sock
port            = 3306
basedir         = /usr
datadir         = /var/lib/mysql
tmpdir          = /tmp
lc-messages-dir = /usr/share/mysql
skip-external-locking
innodb_file_format = Barracuda
innodb_file_per_table = 1
innodb_large_prefix
character-set-server = utf8mb4
collation-server = utf8mb4_unicode_ci
skip-character-set-client-handshake

key_buffer_size         = 16M
max_allowed_packet      = 16M
thread_stack            = 192K
thread_cache_size       = 8
myisam_recover_options  = BACKUP
query_cache_limit       = 1M
query_cache_size        = 16M

#Decide to enable the below arguments if you want to enable
#logs. These will generate a log logs. Be careful with size.

#general_log_file        = /var/log/mysql/mysql.log
#general_log             = 1
log_error = /var/log/mysql/error.log
expire_logs_days        = 10
max_binlog_size   = 100M
character-set-server  = utf8mb4
collation-server      = utf8mb4_general_ci

[embedded]

[mariadb]

[mariadb-10.1]
Save the above file and exit. Create a new file for maintaining the galera configuration in /etc/mysql/mariadb.conf.d/galera.cnf
[mysqld]
bind-address=0.0.0.0
default_storage_engine=InnoDB
binlog_format=row
innodb_autoinc_lock_mode=2

# Galera cluster configuration
wsrep_on=ON
wsrep_provider=/usr/lib/galera/libgalera_smm.so
wsrep_cluster_address="gcomm://10.1.65.108,10.1.65.109"
wsrep_cluster_name="mariadb-galera-cluster"
wsrep_sst_method=rsync

# Cluster node configuration
wsrep_node_address="10.1.65.109"
wsrep_node_name="galera-db-02"
Save the file and exit
Testing the cluster
- On Node 1
$ sudo galera_new_cluster
$ sudo systemctl status mariadb (should be seen Active)
$ sudo mysql -u root -p -e "show status like 'wsrep_%'"
There will be a long output on running the above command. search for 'wsrep_cluster_size' the value of which should be 1
$ mysql -u root -p -e "show status like 'wsrep_cluster_size'"Cluster size should be seen as 1. If the value is seen as 1, then the galera cluster has been activated with one node.
- On Node 2
$ sudo systemctl stop mariadb
$ sudo systemctl start mariadb
$ sudo systemctl status mariadb (should be seen Active)- On Node 1
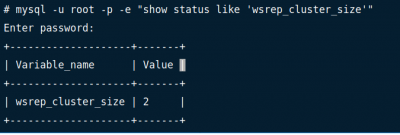
$ mysql -u root -p -e "show status like 'wsrep_cluster_size'"Cluster size should now be seen as 2. If the value is seen as 2, then the galera cluster has been activated with both nodes.

Conclusion
MariaDB cluster using galera is a production ready solution and is scalable. Multiple nodes can be added in this way to make multinode cluster helping to build resiliency and high avalability to database environments.